The Business Hours feature lets you generate reports based on your actual operating hours instead of the standard calendar day. This is especially useful for restaurants, cafés, bars, and other businesses that operate past midnight.
For example, if your business operates from 4:00 PM to 2:00 AM, all sales during this period can be counted as one business day instead of being split across two calendar days.
Set Up Business Hours
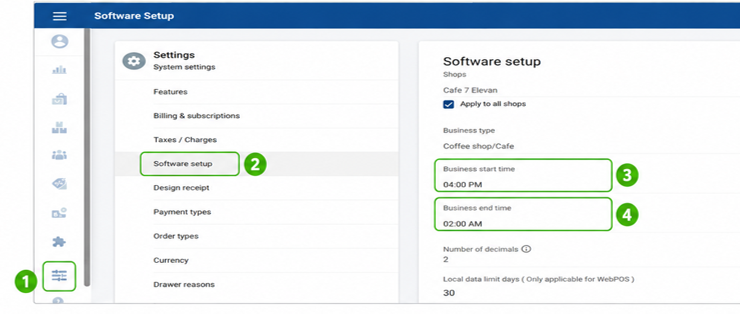
Go to Settings → Software Setup, select the required shop, and set the Business Start Time and Business End Time. If different shops have different operating hours, uncheck Apply to all shops before setting the hours. Click Update to save your settings.
Set Up Business Hours
Follow these steps to configure your business operating hours:
- Log in to the SalesPlay Backoffice.
- Go to Settings.
- Select Software Setup.
- Select the shop you want to configure.
- If all shops have the same operating hours, keep Apply to all shops checked.
- If shops have different operating hours, uncheck Apply to all shops.
- Enter your Business Start Time.
- Enter your Business End Time.
- Click Update to save your settings.
Enable Business Hours in Reports
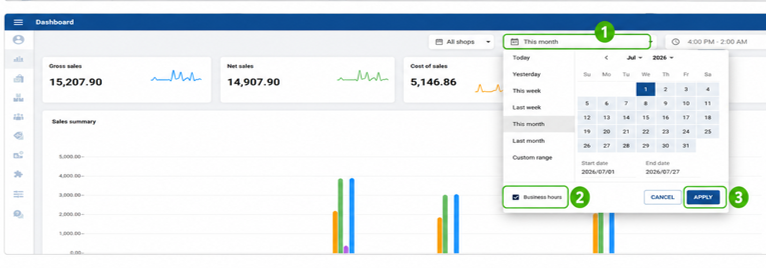
To use Business Hours when viewing reports, go to Reports → Dashboard, select the shop, and click the Calendar icon. Select your date range, check Business Hours, and click Apply.
Enable Business Hours in Reports
- Go to Reports.
- Select Dashboard.
- Select the required shop.
- Click the Calendar icon.
- Select your date range.
- Check Business Hours.
- Click Apply.
- The report will now display data based on your configured business hours.
Note:
The Business Hours option is available only in supported reports, not in every report.
The Business Hours filter is saved in your web browser. If you use another browser or computer, you will need to enable it again.
For reports covering multiple days or custom working periods, use the Shift Report, which provides sales, payment, refund, tax, discount, and drawer transaction information.