Supplier Credit Settlement Management helps you manage purchases made on credit from your suppliers. You can create credit Purchase Orders (POs) and Goods Received Notes (GRNs), track outstanding supplier payments, make partial or full settlements, and view settlement history and reports.
You can also set supplier credit limits, assign payment due dates, receive due-date reminders.
How Supplier Credit Works
The general process is:
Enable Credit Purchase for Supplier → Create PO or GRN → Receive Goods → Record Supplier Credit → Track Outstanding Amount → Settle Payment
A supplier credit transaction is created when a Credit GRN is completed. Creating a Credit Purchase Order alone does not increase the supplier’s outstanding balance.
1. Enable Credit Purchases for a Supplier
You must enable credit purchasing in the supplier profile before creating a credit PO or GRN.
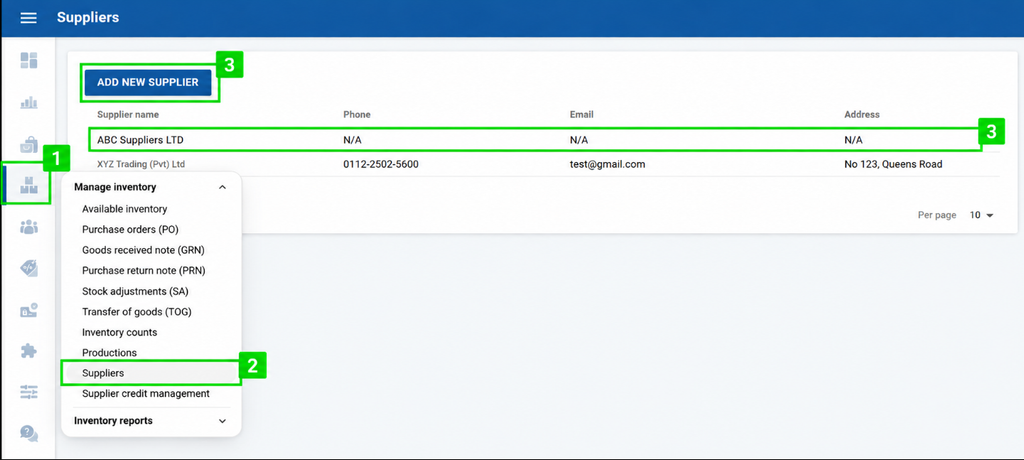
- Log in to the SalesPlay Backoffice.
- Go to Inventory.
- Select Suppliers.
- Click Add New Supplier or edit an existing supplier.
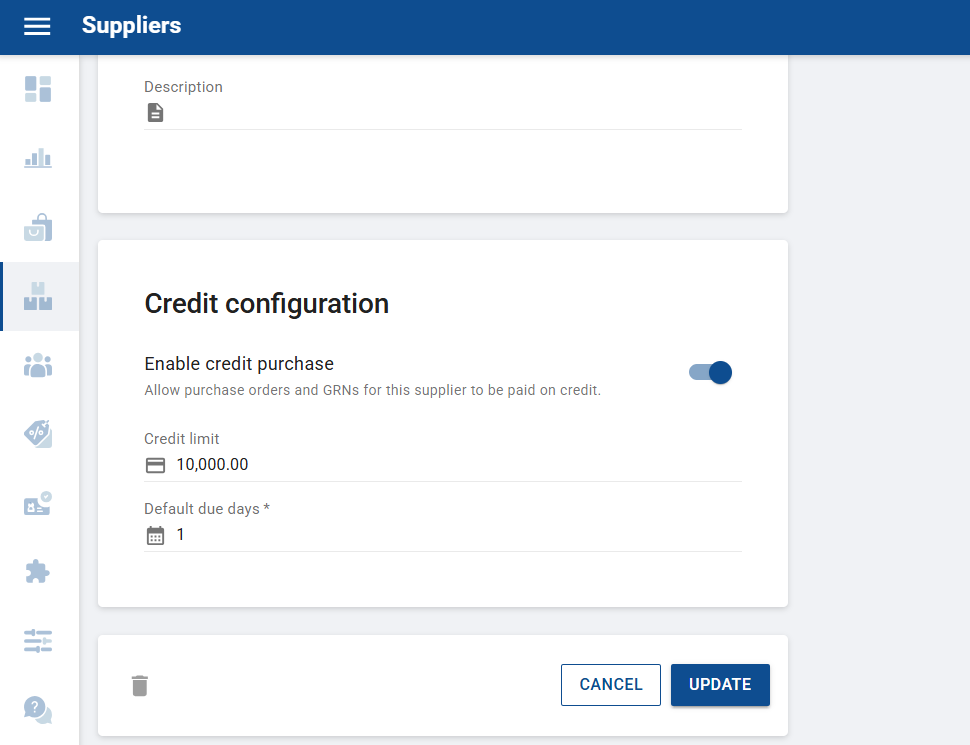
- Go to Credit Configuration.
- Enable Credit Purchase.
- Enter the Credit Limit, if required.
- Enter the Default Due Days.
- Click Update.
Credit Limit
The credit limit controls the maximum outstanding credit allowed for the supplier.
If you do not enter a credit limit, credit limit validation will not be applied to that supplier.
If a credit purchase exceeds the configured credit limit, the system will show:
The supplier’s credit limit has been exceeded.
2. Create a Direct Credit GRN
You can also create a credit GRN without creating a Purchase Order first.
- Log in to the SalesPlay Backoffice.
- Go to Inventory.
- Select Goods Received Note (GRN).
- Click Create GRN.
- Select the Shop.
- Select the Supplier.
- Enter the supplier invoice number, where applicable.
- Select the products.
- Enter the received quantities.
- Complete the GRN.
3. Create a Credit Purchase Order
You can create a Purchase Order using Credit as the payment type.
- Log in to the SalesPlay Backoffice.
- Go to Inventory.
- Select Purchase Order (PO).
- Click Create PO.
- Select the Shop.
- Select the Supplier.
- Select the required products.
- Enter the required quantities.
- Complete the Purchase Order.
Important
Creating a Credit Purchase Order does not increase the supplier’s outstanding balance and does not update stock.
The supplier’s outstanding amount is updated only after the related Credit GRN is completed.
4. Create a Credit GRN from a Purchase Order
After receiving goods against a Credit Purchase Order, you must create a GRN.
- Go to Inventory.
- Select Purchase Orders PO
- Open the relevant Purchase Order.
- Click Create GRN.
- Verify the supplier and ordered products.
- Enter the actual received quantities.
- Confirm the Credit payment type.
- Select the Due Date, if required.
- Complete the GRN.
When the Credit GRN is completed:
- Stock is updated.
- A supplier credit transaction is created.
- The supplier’s outstanding amount increases.
- The GRN due date is saved.
- The settlement status is set to Unsettled.
You can then manage the outstanding credit from Supplier Credit Management.
5. Settle Supplier Credit
You can settle a supplier credit in full or make a partial payment.
You can also settle multiple GRNs together.
Settle a Single GRN
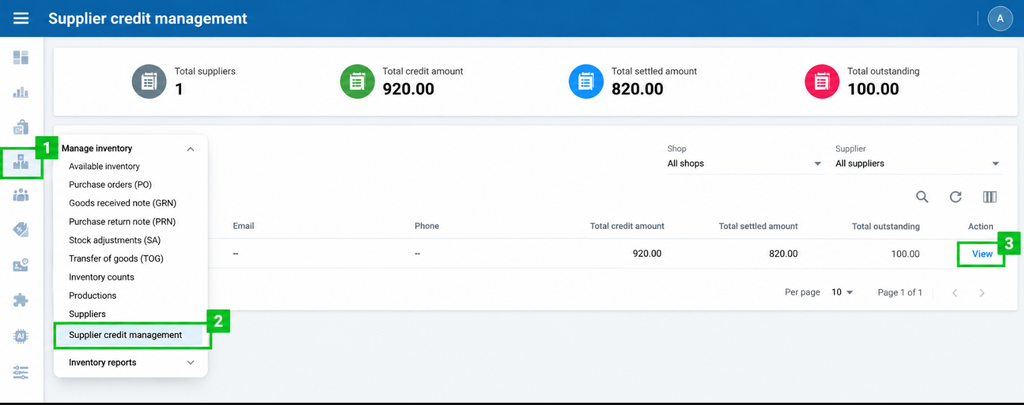
- Go to Inventory → Supplier Credit Management.
- Select View for the relevant supplier.
- Go to the Outstanding tab.
- Find the GRN you want to settle.
- Click Settle.
- Enter the Settlement Amount.
- Select the Payment Method.
- Select the Payment Date.
- Add Notes, if required.
- Click Review Settlement.
- Review how the payment will be applied.
- Click Confirm Settlement.
Payment Methods
The available settlement payment methods include:
- Bank Transfer.
- Cash.
- Cheque.
- Card.
Note: Credit cannot be used as a settlement payment method.
6. Settle Multiple GRNs
You can settle multiple outstanding GRNs in one settlement.
- Go to Inventory → Supplier Credit Management.
- Select the supplier.
- Go to the Outstanding tab.
- Select the required GRNs using the checkboxes.
- Click Settle Selected.
- Enter the settlement amount.
- Select the payment method.
- Select the payment date.
- Add notes, if required.
- Click Review Settlement.
- Review the payment allocation for each GRN.
- Adjust the allocation if required.
- Make sure the full settlement amount has been allocated.
- Click Confirm Settlement.

When multiple GRNs are selected, the system applies the payment to the oldest due GRN first. You can adjust the amount allocated to each GRN before confirming the settlement
7. Delete a Completed Settlement
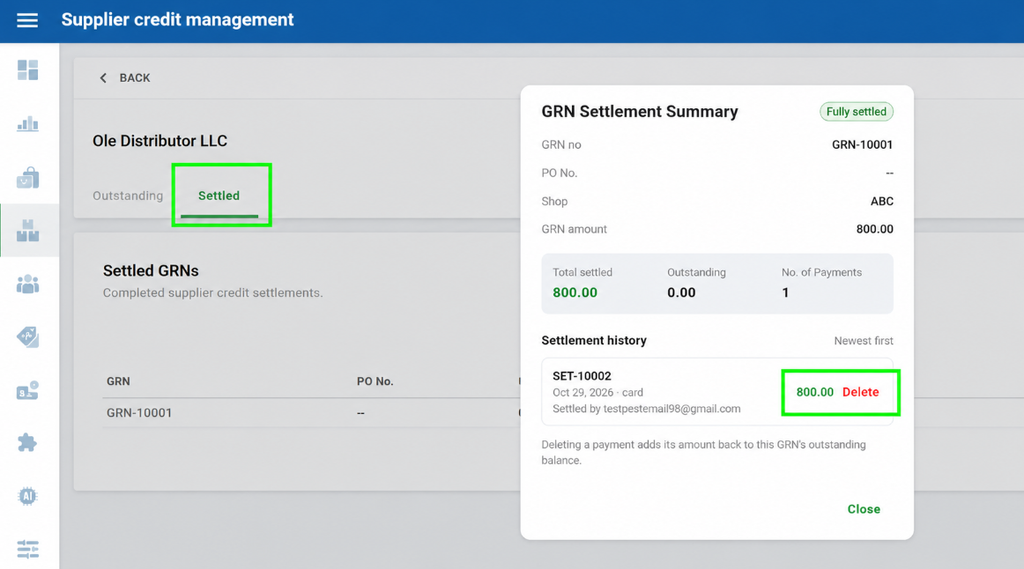
If a settlement needs to be removed, you can delete it from the Settled section of the supplier’s Credit GRN Report.
- Go to Inventory → Supplier Credit Management.
- Select View for the relevant supplier.
- Go to the Settled tab.
- Find the settlement you want to remove.
- Click View.
- Open the settlement details.
- Click Delete where available.
- Enter your password.
- Enter a reason for deleting the settlement.
- Confirm the deletion.
8. Supplier Credit Due Reminders
You can configure supplier credit reminders for each shop.
These reminders help your finance or management team identify supplier payments that are approaching their due dates.
How to Enable Supplier Credit Email Alerts
- Log in to the SalesPlay Backoffice.
- Go to Settings → Business Settings.
- Select Email Notification Settings.
- Turn ON Supplier Credit Due Reminder.
- Enter the email address where you want to receive the notifications.
- Click Update.
Once enabled, the configured email address will receive supplier credit due reminders based on the supplier credit due dates.